OlCabour's Hangar

Aller au contenu | Aller au menu | Aller à la recherche

vendredi, 2 mars 2012

Hangar - Floor

To detail the hangar floor, I prepared a pattern on a large paper sheet, where I determined the position of all the markings.

IMG_8906 IMG_8907

With a slightly darker gray, I realized some panel effects (post-shading).

IMG_8921

I make some masks out of cardboard. and markings are then painted by simply following the pattern.

IMG_8922 IMG_8923

Then paneling effects are applied (by re-using masks from the launchpad), as well as veils and some roughcasts.

  1. Dark gray

IMG_8924 IMG_8925

Incidentally, the yellow and red lines received a light black veil, in order to break their too much flashy appearance.

  1. Light gray

IMG_8929

  1. Medium gray light veils

IMG_8959 IMG_8960 IMG_8961


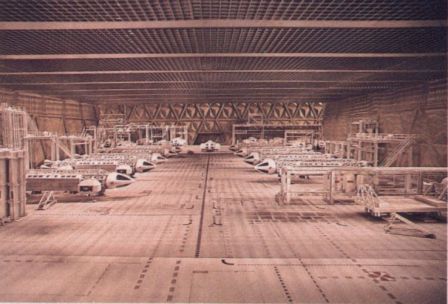
A first test shows that my platforms are still too bright and not enough weathered.

IMG_8934 IMG_8936

They therefore receive an overall dark grey wash

It looks much better (even if it's difficult to realize on this picture)

IMG_8962

The warehouse furniture also receives the same wash, and the decals a matt coat.

IMG_8947

Right: front | Left: with the new wash

IMG_8945

Characters and warehouses (in double from Main Mission diorama) will be dispatched in the hangar. These desks and some furnitures received little paper sheets to give more life.

IMG_9071 IMG_9100

vendredi, 24 février 2012

Eagle hangar - Panels and signs

To break the uniformity of the green walls of the hangar, I add some white, yellow, black and red panels with masks (the same as those used on the Galactica).

IMG_8867 IMG_8868 IMG_8869 IMG_8870 IMG_8871 IMG_8871

Some decals, from the sparebox and from the HO scale diesel loading service platform (danger signs...), are also applied on the walls, as well as on some of the furniture (tanks ...)

IMG_8874 IMG_8875 IMG_8876 IMG_8878

Eagle hangar - Walls, furnitures and plateforms weathering

The green walls received a brown (raw umber) wash.

Left / after - Right / before: IMG_8692

The result dried : IMG_8797

Some elements of the warehouse received touches of colors. IMG_8805

To weather the platforms and furniture warehouse, I used the same technique as on my X-Wings. A very light black juice is applied directly to the Tamiya matt white (as is, so unprotected from any clear coat). This white drinks black like a blotter. This black wash needs to be wiped off quickly to prevent that it darkens too much the white.


Left / after - Right / before:

IMG_8681

jeudi, 23 février 2012

Eagles hangar - Wall painting

Two coats of matt white are applied on the service platforms and furniture warehouse. IMG_8658 IMG_8659

The walls are covered with the Granny apple green in spray can. IMG_8663 IMG_8660 IMG_8661

The hangar ground received a grey color, and is ready for the markings. IMG_8664.JPG

Eagles hangar - Wall painting test

The background wall received its missing triangles.

IMG_8602

The three walls are covered with automotive primer. The staturoc drinks the paint heavily, and it took me four layers rather copious for a good working basis for painting. IMG_8604

A first test of color with a spray can of an Granny apple green. IMG_8624 IMG_8625

The gray primer breaks well below the green on photos taken without the camera flash. In the first shot, so with flash, it does not look as nice. Later, I will test with a dark brown juice. I have to determine if it will be as preshading or postshading. And maybe a light veil of a lighter color (yellow or tan) with the airbrush. Otherwise, I will have to mix of color.

Beforehand, I must take care of the external sides, and paint them black. The trestles are wrapped in protective sheets to protect the staturoc sides, which will laid on them.

IMG_8623

The chamfers are brush painted with an universal primer. It is thined with white spirit and then applied on flat surfaces with a spray paint gun. IMG_8626 IMG_8630

The next day, it was the turn of the black (also thinned with white spirit). After each application, I accelerated the drying with a heat gun. IMG_8650

To paint wood, I prefer to avoid acrylic paints and stay on glycero paints.

In parallel, service platforms and furnitures of received a coat of primer. IMG_8607

vendredi, 13 janvier 2012

Eagles hangar - Walls

The diorama is made from medium (wood) boards cut to size. It is designed to be removable and portable, which means here to made it easy to assemble/disassemble and to properly secure the staturoc details (triangles,...).

The boards are cladded with aluminum strips (i, L, square) to border all the areas I will detailed, and to create slides where the boards will be embedded boards.

IMG_8535 IMG_8536

A first rather thick PVC profile is bonded to the aluminum rod.

IMG_8565

After that, the detailing takes place, with the famous triangles. The lapidary wheel, band sander, band saw are used to smoothly anf quickly carry out the job.

IMG_8566 IMG_8567 IMG_8570 IMG_8571 IMG_8572 IMG_8580

Both right and left walls are now detailed. The back wall is still in progress, because I run out of triangles. I need to mold some new ones.

IMG_8582 IMG_8583

The leaf in the center of this wall will be left open. Two slides are set in place to allow me the choice to add behind the wall a closed down leaf, or a mirror (which is likely to be the solution that I will use at Migennes). And it may well be left open, if ever one day I want to build another hangar to expose some Hawk, Ultraprobe, Swift, etc.

IMG_8584 IMG_8585

Eagles hangar - Furnitures (2)

Here is a short chronology of situation tests, to observe the progress of the development of the hangar. The floor tiles are 60cm squares, which was convenient to simulate the diorama (1.20m x 1m).

First test - October 16, 2011

With the first service platforms

IMG_8410.JPG IMG_8411.JPG IMG_8412.JPG


Second test - October 22 2011

All the platforms are here, but they are lack ing handrails (still on order at that time). Some first set furnitures appear

IMG_8413.JPG IMG_8414.JPG IMG_8415.JPG IMG_8416.JPG


Third test - October 27, 2011

The platforms are finished. 95% of the set furnitures are there.

IMG_8488.JPG IMG_8419.JPG IMG_8423.JPG IMG_8424.JPG IMG_8426.JPG IMG_8427.JPG IMG_8428.JPG IMG_8429.JPG IMG_8430.JPG IMG_8431.JPG IMG_8432.JPG IMG_8433.JPG


The Plateforms

The service platforms are strongly inspired by the original models, without trying to be 100% accurate, because it's more an atmosphere that I'm trying to create.

  • Platform type 1, based on the Plastruct kit

IMG_8404.JPG IMG_8405.JPG

The winches are made from on ankles, AFV wheel, windbreaker buttons...

IMG_8403.JPG


  • Platform type 1 - stairs to the left

IMG_8460.JPG IMG_8461.JPG


  • Platform type 2

IMG_8465.JPG IMG_8466.JPG


  • Platform type 3

IMG_8467.JPG


  • Platform type 4

IMG_8462.JPG IMG_8463.JPG IMG_8464.JPG


  • Platform type 5

IMG_8468.JPG IMG_8480.JPG


  • Platform type 6

IMG_8470.JPG


  • Platform type 7

IMG_8471.JPG IMG_8472.JPG IMG_8473.JPG

  • Platform type 8 - HO platform for train diorama (Cornerstone brand, so non-accurate)

IMG_8406.JPG


  • Platform type 9 - platform seen in the episode "Earthbound" to access the Kaldorians ship (the blue pear !)

IMG_8495.JPG IMG_8492.JPG IMG_8493.JPG


The furnitures : tanks, cans ...

Created from spares parts : felt pen cap , model kit parts (AFV, macross, Gundan ,...), tubes, kinder, X-wing engine covers ...

IMG_8479.JPG IMG_8476.JPG


The ramps:

A ramp available from SciHigh models (http://scihighmodels.com/eagle.html)

IMG_8407.JPG IMG_8408.JPG IMG_8409.JPG


And some others in scratch

IMG_8474.JPG

Eagles hangar - Furnitures

To fill the hangar, I will of course seriously dip into the spares box. However, I will have to find stairs, ladders, service platforms. In surfing on the web, and with the help of Alexandre Dumas (http://scihighmodels.com/) , I came to look for references in the HO scale (or 1/87, an electric trains scale). This is a scale quite close to 1/72 so it will be perfect. Eagles Airfix / Product Enterprises are also certainly closer to the HO than the 1/72 announced (a few years ago, I was even going for a 1/100).

So I ordered a few elements (platforms from Plastruct and Cornerstone brands) to make some tests. http://www.hobbylinc.com/htm/wrr/wrr3104.htm http://www.hobbylinc.com/htm/pls/pls1010.htm

Cornerstone: it is a loading platform of oil or petroleum. It is injected into a kit, the installation is relatively simple. All parts are not useful for my needs. IMG_8399

Plastruct: I was expecting a kit, and in fact, it is a scratch to build ... So I was really surprised. Rather than faithfully follow the instructions (low high plateform for loading wagons), I attacked directly the building of a platform for maintenance of a motor eagle therefore higher.

IMG_8400 IMG_8401

Thanks to Plastruct, I knew exactly identify the elements I needed to make more than a dozen platforms.

A fairly consistent order of rails and stairs only quickly followed (on a US site because Plastruct is no longer distributed in France). All other sections needed (I, U, L, H) are easily found here in Paris.

IMG_8588

Eagles hangar - Molding wall details

The hangar walls consist mainly of large triangles, themselves composed of four small triangles.

IMG_8367

So I assembled a large triangle (made ​​with four small ones and a strip), I then molded and made ​​some test copies with staturoc. It is a kind of resin powder that is mixed with water and casts like plaster, it also have the same color. I've tested with few copies to check if they fit well. There is a slight space, which will be work with the lapidary. As the result suited me, but as the staturoc seemed fragile, I then tested with polyurethane resin, and it was a disaster : the mold broked. I'm good to start again...

After restocking some RTV, the molds are casted again. To avoid a new disaster, I came back on staturoc copies.

IMG_8586

I recently learned a convenient way to know if RTV is homogeneous mixed : just add a few drops of enamel paint along the catalyst (red here). When the color of the mixture is smooth, it is ready to be cast (here rtv has become evenly pink)

I had to find a way to stick securely my staturoc parts on wooden boards. I considered a hot glue gun, but the glue cools too quickly and does not really on the staturoc. While looking for bathroom silicone in a store, I finally opted for a multi-purpose glue (applied through a gun).

vendredi, 23 décembre 2011

Eagles hangar

I always want to create a diorama of the eagles hangar, as it appears in this picture (from an old website - Cybrary, which was the bible of Space 1999 before the Catacombs

((/public/space1999/hangar/HANGAR-1.JPG

Cybrary has been integrated for a long time to Catacombs, but curiously, this picture has not followed the movement and now cannot be found on the net.

This view is never shown as is in the serie, but only in the background. In the first episode ("Breakaway"), we can see it with an eagle sliding in front of, then through a window in a shot where Koenig and Alan Carter are discussing about the metaprobe project. http://www.space1999.net/catacombs/main/cguide/umhangar.html

As I originally wanted a dio combined with the launchpad, I did set it the same dimensions, so 1.20 m x 1 m. Indeed, the initial idea was, while designing the two dio independently, to allow me to stack them if the exhibition place proved to not be enough. The launchpad taking the volume (it needs a box to hide the lifting mechanism), taking in weight by consequence, this option is unlikely to be implemented in the end. However, I decided to keep the same dimensions.

In the launchpad kit, I was surprized to received some of the walls parts (tetrahedron and detailed slabs). I realized casting molds of these parts as I will have close to 3 feet long of walls to cloth !

IMG_8591 IMG_8590

Initially, I also considered that the hangar would be within a one meter square, the remaining 20 cm on a side intended to be partially "filled" with little supervision room, where takes place the shot presented above, and where, later in the same episode, Koenig stop the metaprobe project. Finally, the hangar has taken the entire surface, and the supervisory room is gone.